Tampilkan postingan dengan label tricks and tips. Tampilkan semua postingan

VBScript - How to make a text encryption program

Posted by Unknown Senin, 29 Juli 2013 0 komentar

VBScript - How to make a text encryption program


     * This is a simple HTML application which can encrypt and decrypt the text entered into a text box using the given key. The encryption algorithm is really simple and the output is in only uppercase alphabet letters and numbers. The drawback of the program is that it will double the length of the string when encrypting. Don't use this encryption program as the only source of security for important data.
To make the encryption program save the following code with .hta extension using notepad.

Copyright © 2013 | By - Anbuselvan


Remember to leave your ratings and comments. Also share the blog with your friends and family!


Baca Selengkapnya ....

Genuine Windows 7 Became Pirated? Make It Original

Posted by Unknown Senin, 01 Juli 2013 0 komentar

Genuine Windows 7 Became Pirated? Make It Original 


Its a common problem which lots of Windows 7 users face. We have received many emails about this problem, so today we are sharing a working solution for it. In fact many Windows 7 SP1 RC users are also facing this problem.


 Caution :- The Original post credits goes to askvg.com
Problem Symptom:


*You were using genuine Windows 7 without any problem. It was activated properly. But one day when you logged into Windows, you received following message :
                                                         Windows is not genuine :(
 
Your computer might not be running a counterfeit copy of Windows.


This_Copy_of_Windows_is_not_Genuine.png


     Along with the above mentioned message, you also noticed that the desktop background became black and following error message was shown on the bottom right corner of the screen:
This copy of Windows is not genuine.
Also when you checked System Properties, you got following error message:
You must activate today. Activate Windows now.
Problem Cause:
     Actually this problem occurs when there is a lack of permissions on a registry key "HKEY_USERS\S-1-5-20". By default, System, Network Service and Administrator accounts have "Full Control" and "Read" permissions on this registry key. But sometimes "Network Service" doesn't have proper permissions on this registry key and you face this problem. This may be the result of applying a Plug and Play Group Policy object (GPO). The Licensing service uses Plug and Play to obtain your system hardware ID information and binds the license to the computer. By default, it doesn't have proper permissions to access Plug and Play service.
Problem Solution:
There are 2 solutions actually. You can try them one by one:
METHOD 1: Using RSOP
1. Type rsop.msc in RUN or Start Menu search box and press Enter. It'll open RSOP (Resultant Set Of Policy) window.
2. Now go to:
Computer Configuration/Windows Settings/Security Settings/System Services
3. In right-side pane, check "Startup" type of "Plug and Play" service. It should be set to "Not Defined". If its not, double-click on it and set its Startup type to "Automatic".


Resultant_Set_Of_Policy.png


4. Now provide following command in RUN or Command Prompt:
gpupdate /force
5. That's it. Restart your system and your problem should be fixed.
METHOD 2: Using Registry Editor
1. Type regedit in RUN or Start Menu search box and press Enter. It'll open Registry Editor.

2. Now go to following key:
HKEY_USERS\S-1-5-20
3. Right-click on "S-1-5-20" key and select "Permissions...". It'll open a new window.

4. Select "NETWORK SERVICE" in user list and check "Allow" box given for "Full Control" permission. Click on OK button to apply the changes.


Permissions_S-1-5-20_Registry_Key.png 


NOTE: If "NETWORK SERVICE" is not present in user list, click on "Add" button. Now type Network Service in "Enter the object names to select type" and click on "Check Names" button. It'll detect and confirm the username. Click on OK button.

5. That's it. Restart your system and your problem should be fixed.


Baca Selengkapnya ....

How to remove Windows 7 Genuine Notification Completely

Posted by Unknown 0 komentar

How to remove Windows 7 Genuine Notification Completely

Windows 7 Genuine Notification
Windows 7 activation
windows 7


           Hello Guys Today I Came With Some Amazing Stuff To Remove Very Annoying Notifications Of Windows Genuine On Windows 7.
  Many Of my friends Suffering From This Problem Now A Days And There Is No Other Solutions To Remove This Type Of Notifications.

Why its happens ? :
                
          If You Don’t Buy A Genuine Windows 7 Version Than It Has Happened To You. And It Is So Annoying.

Ok, How to get rid of it Completely? 

                        So, Today I Give You The Software With Tutorial To Help You Remove This Type Of Notifications Completely From Your Windows 7.

So Follow The Procedure Here…

         First Of all Download The RemoveWat Software From The Below Link.

What is RemoveWat ? 

     => RemoveWat Is A Software That Help Us To Remove Windows 7 Genuine Notifications Completely From It. Here I Packed Latest Version Of RemoveWat 2.2.5.

Click Here To Download (3.74 MB)

After Download The Package, Extract It To Your Pc And Open RemoveWat.exe.
Note That It Is Recommended To Close All Programs Before Open It.
 
UPDATE : If Your Antivirus Prompt You The File As Virus, Then Don’t Worry, It Only Show Because Windows Don’t Like It Because It Removes Windows Genuine Notifications. It’s Not A Virus So Enjoy Using It.
 
After Open It Click On RemoveWat And Wait For 2 Minutes And After It’s Done, Your Pc Will Be Restart.

After Restart Your Windows Pc, You Can See That All Notifications Of Windows Genuine Will Be Removed And You Have A Completely Genuine Windows 7.


Baca Selengkapnya ....

10 Youtube URL Tricks You Should Know About Youtube

Posted by Unknown Minggu, 30 Juni 2013 0 komentar

10 Youtube URL Tricks You Should Know About Youtube

youtube tricks
Youtube – You know that site with videos and all. Yeah! It turns out that its quite popular and you happen to visit and use it quite often. Instead of just searching and playing here are some top Youtube URL tricks that you should know about:

1. View high quality videos

   Youtube gives you the option to switch to high quality videos for some of the videos, however you can check if a video is available in high quality format by appending ‘&fmt=18′(stereo, 480 x 270 resolution) or ‘&fmt=22′(stereo, 1280 x 720 resolution) for even higher quality.

2. Embed Higher Quality Videos

While the above trick works for playback, if however you want to embed high quality videos you need to append “&ap=%2526fmt%3D18″ and “&ap=%2526fmt%3D22″ to the embed url.

3. Cut the chase and link to the interesting part

Linking to a video where the real action starts at 3 minutes 22 seconds, wondered if you could make it start at 03:22? You are in luck. All you have to do is add #t=03m22s (#t=XXmYYs for XX mins and YY seconds) to the end of the URL.

4. Hide the search box

                youtube url start time 

   The search box appears when you hover over an embedded video. To hide the search box add ‘&showsearch=0′ to the embed url.

5. Embed only a part of Video

             youtube url to mp3

      Just append ‘&start=30′ to skip first 30s of the video. In general you can modify the value after start= to the number of seconds you want to skip the video for.

6. Autoplay an embedded video

Normally when you embed a Youtube video and load the page, the player is loaded and it sits there waiting for you to hit the play button. You can make the video play automatically by adding ‘&autoplay=1′ to the url part of the embed code.

7. Loop an embedded video

Append ‘&loop=1′ to make the video start again without user intervention after it reaches the end.

8. Disable Related Videos

                         youtube url downloader
Publishing your content in the form of Youtube video? Don’t want people to see other people’s content that may be related but may as well be in competition to you? Just add ‘&rel=0′ to the end of the url part of the embed code and you just turned off the related video suggestions!

9. Bypass Youtube Regional Filtering

Some videos are only available in certain parts of the world. Your IP Address is used to determine your location and then allow or deny access to the video. Change the url from http://www.youtube.com/watch?v=<somecode> to http://www.youtube.com/v/<somecode>

10. Download Video

Although not inherently a youtube trick but useful all the same for downloading videos. Just change youtube to kickyoutube in the url of the video and it will take you to kickyoutube.com with all the options for downloading the video you were watching.

Do you know of some similar Youtube URL tricks and hacks? Fire them in comments!  

If you like our post dont forgot to comment ....


Baca Selengkapnya ....

Find the IP address of a website using CMD

Posted by Unknown 0 komentar

Find the IP address of a website using CMD


     Today I am going to show you how to get the IP address of a website using CMD. It is easier than you might have imagined. Just a simple command will do the trick.
There are two basic commands which you can use to get the IP: tracert and ping.
 *Open the CMD and type either of the commands below.
Replace www.example.com with the site you want to get the IP address of.

tracert www.example.com
ping www.example.com
When the ping and tracert command is run something like this will show up:

Pinging www.example.com [192.0.43.10] with 32 bytes of data:
Tracing route to www.example.com [192.0.43.10]
In both cases the IP address is between the square brackets. Keep tuned for my future posts!


Baca Selengkapnya ....

VBScript prime number generator

Posted by Unknown 0 komentar

VBScript prime number generator


  This is a really cool HTML application which finds all the prime numbers in a given range. This program is pretty fast for low ranges and may raise the core usage to 100 or 90 percent for very large ranges. So I prevented large ranges from being entered as it caused some errors and caused the computer to crash.
The VBScript used in the program is really simple. The program tries to get a integer number by dividing it with all possible numbers and if does not get an integer the number is confirmed as a prime number. This process is repeated for all the numbers in the given range.
To make the program paste the following code in notepad and save with a .hta extension.

Copyright © 2013 | Prime Calculator - By #XByte


Baca Selengkapnya ....

Make a simple windows 7 gadget

Posted by Unknown 0 komentar

Make a simple windows 7 gadget

 First of all what are gadgets? 

Gadgets are lightweight HTML and script-based applications which can present information or provide functionality from a variety of sources such as websites or services. To make a gadget you need to know the basic of HTML.


     * In this tutorial I am going to show you how to make a simple windows 7 gadget. A basic gadget needs an XML file named exactly gadget.xml and an HTML file with the gadget name. Also you can include any pictures needed in the gadget. In this tutorial I am going to show you how to make a simple demo clock gadget which would display time in a simple way. Just follow the steps given and if you know basic HTML you will find it easy to understand.


Procedure to make a gadget.. 
 
Step 1:  First of all make a new folder on your desktop and rename it anything you want.

Step 2: Put the html file which would be your gadget into the folder and rename the file as the name of the gadget. In this case the name would be NXClock.html. The demo code for the html is given below.

Caution : If u know HTML mess with it or else dont modify just learn and come back to make a gadget..


Step 3: Now save the following code as gadget.xml EXACTLY into the folder you created earlier. Do not name it anything else or the gadget will not work. You must replace the NXClock.html with the name of the html file if you are making your own gadget. And you can change the title too.

Caution : If u know HTML mess with it or else dont modify just learn and come back to make a gadget.. 


Step 4:  Add the NXClock.html and gadget.xml to a zip file. 

  Be careful to add the files to the zip file, NOT the folder containing them.

Step 5: Now change the extension of the zip file to .gadget. You can either do this by going to folder options > View and disabling the Hide extensions for known file types and then changing the extension. Or else you can do it using command prompt.

Step 6: Now you will have ended with a windows gadget file. Open it and click install and if all went right a new gadget would appear on your desktop!

ANy doubt Ask in comments always welcome ....

Video :- 

       Video will be soon..


Baca Selengkapnya ....

Make a simple calculator in HTML using VBScript

Posted by Unknown 0 komentar

 Make a simple calculator in HTML using VBScript


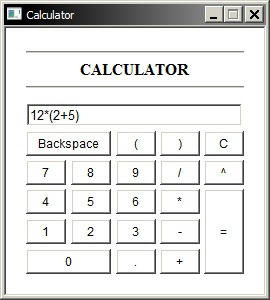
*This is a very simple calculator made with HTML and coded with VBScript. This hta file simply evaluates the expression in the text box. The expression can be entered using the mouse to click the buttons or else from the keyboard. To prevent the chance of invalid data being entered, only numerical keys and the signs are allowed on the keyboard. Also you can use Enter key to evaluate the expression and C to clear the text box.
To make the calculator just save the following code with a .hta extension using notepad. Hope this code helps you improve your scripting! Happy Hacking..


Baca Selengkapnya ....

Create new partitions on windows 7 hard drive

Posted by Unknown 0 komentar

Create new partitions on windows 7      hard disk 

Create New partions in windows 7


Today I am going to show you how to create new partitions on windows 7 hard drive. This instructable is complete with pictures and step by step procedures so I think you won't have any difficulties in understanding.


 Step 1: Right click Computer and select Manage.


Step 2:     Select Storage > Disk Management.


Step 3:   Right click any volume and select Shrink Volume... from the menu.


Step 4: Enter the amount of space in MB to shrink and click Shrink.


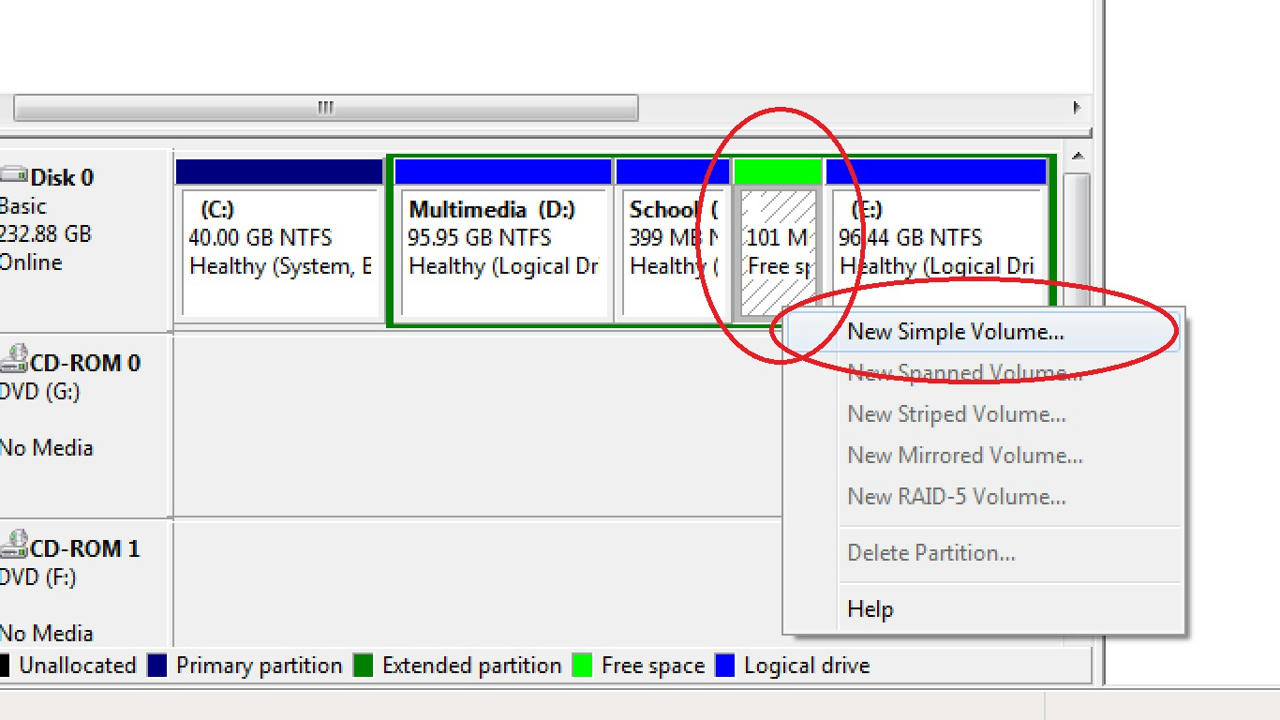
Step 5:  Right click the green space labled 101 MB Free space and select New Simple Volume.


Step 6: Click Next.


Step 7: Specify the new volume size in MB and click Next.


Step 8: Select a drive letter for the new volume and click Next.


Step 9: Specify the file system, name and other settings for the new volume and click Next.


Step 10: Click Finish to create the volume.


Step 11: Wait for a moment and open My Computer. A new volume would be there!


Please remember to leave your ratings and comments. Also if you want to know how to delete the newly created volume leave it in the comments and I will post it. Enjoy!


Baca Selengkapnya ....

Get a list of all files on a drive

Posted by Unknown 0 komentar

Get a list of all files on a drive


This is a batch file designed to secretly get a list of all the files and folders on a drive via a USB drive. The batch file even lists hidden files. All you have to do is put the batch file into the USB drive and make your victim open it. When you get back the USB drive the list would be waiting for you!
The listing of the files could take some time. So it is essential that the victim does not close the batch file until the listing is completed.

 You can achieve this in two ways:
One way is to run the batch invisibly as a process using two extra short VBScript files. I will show you how to do this in a later post.
The other way is to mask the listing of the files with some spoof like system configuration or something important.
In this trick I am going to use the second method.
This is easier than the first method.

Step 1: Paste the following code into notepad and save as a .bat file.


Step 2: After saving, copy the batch file into the root of your USB drive.

Step 3: Now the trap has been set. Give the USB drive to your friend and use some social engineering to make him/her open it. You can tell your friend that it is a software you made or some cool software. This depends on your social engineering skills. Just make him/her open it remember to tell not to format the USB drive.

When you get back the pendrive the data collected would be in a hidden text file. To reveal the text file:

Step 1: Open command prompt window.
 To open a command window goto start menu and type cmd into the search bar and press enter.

Step 2: Assuming the USB drive letter is F Enter the command into the cmd window and execute it : attrib "F:\XBData.txt" -h -s

After you reveal the text file open it and you will see a list of files stored in his drives including the hidden ones. This trick greatly depends on your skills in social engineering.

Enjoy the look of your friends face when you tell them where he stores certain files and what files he/she has hidden!

 Remember to rate this post and leave any questions.


Baca Selengkapnya ....

Funy tricks :Toggle indicator lights on keyboard

Posted by Unknown 0 komentar

Toggle indicator lights on keyboard


Most probably your keyboard has three indicator lights indicating whether the caps lock, num lock, or scroll lock is on or off. It will be a great trick to show your friends if you can make them flash on and off continuously turning your keyboard into a small disco! So lets turn the keyboard into a disco! No extra software is needed.


*Paste the following code into notepad and save it as a .vbs file.


When you open the file the indicator lights on your keyboard will begin to flash on and off.

Any Damage in my pc ? 

Dont Need to fear .This is completely harmless.

How to terminate it (close it ) ?

To end the program open windows task manager by pressing Ctrl+Shift+Esc and kill a process named wscript.exe under the process tab.


Any problem share with us.. we will provide solution for you ...


Baca Selengkapnya ....

Make the computer speak

Posted by Unknown 0 komentar

Make the computer speak

Image

Here is a GUI program which will speak out the text entered into the textbox or speak out the contents of a specified text file. This simple HTML application or hta file coded in VBScript has a stop button to stop the speaking once it has started. Sadly there is no function to pause the speech. :(


 Caution :   DOnt modify the codings There is a chance of damaging your data ..

Do not forget to leave your comments and ratings after trying this out!

Baca Selengkapnya ....

Hidden themes in windows 7

Posted by Unknown 0 komentar

Hidden themes in windows 7

Image

Did you know that windows has several hidden themes? Here is an easy trick to unlock the hidden themes.

Step 1:  Paste the following address into the address bar of windows explorer and
press enter : C:\Windows\Globalization\MCT
Step 2:   You will see five folders. Open any of them.

Step 3: Now you will see three folders. Open the folder named theme and open the theme file to install and apply the theme!

Step 4: Repeat step 2 and step 3 for every folder.
 If u love our post You can like Our pages and even join our group ..
thanks any doubt ask me in Comments..


Baca Selengkapnya ....

Extract Text from Images

Posted by Unknown 0 komentar

Extract Text from Images

Image

                   Sometimes when you want to get text from an image file to a text file you have to type it all into notepad. This is really difficult especially if the text is long and you are a novice typer. An easier alternative is using an OCR (Optical Character Recognition) software. There are many online services providing you with this. But I am going to teach you a little trick to extract text from images using a software included in the Microsoft office package called OneNote.

Step 1:
 Goto Start menu > All programs > Microsoft Office > Microsoft OneNote.


Step 2:

Copy and paste the image into OneNote.


Step 3:

  Right click the image in one note and select Copy Text from Picture.

Step 4: 
Now open notepad and press Ctrl+V.

Step 5: 

Correct any spellings errors.

Note :
Hope you found this useful and informative. Remember to leave your ratings and like and share the blog! Keep tuned for more great posts.

Baca Selengkapnya ....

Make a WinRAR password cracker

Posted by Unknown 0 komentar

Make a WinRAR password cracker


Winrar password cracker


       This is a simple password cracker for WinRAR archives which can crack numeric passwords. The method works only on .rar files. You should have WinRAR installed to make this password cracker. Follow the easy steps below and see how easy it is!


Step 1: Make a new folder on your desktop.


Step 2: Save the following code as PWCrack.bat using notepad into the folder you created earlier.


  Step 3: Last of all browse to the directory where WinRAR is installed. Usually this will be C:\Program Files\WinRAR. Find a file named UnRAR.exe and copy it into the folder created in Step 1.

Step 4: After you copy the file open the batch file and enter the path to the archive to start the cracking process. Eg: "C:\Users\XByte\Desktop\Secret.rar".


NOTES:

  • Remeber to keep the both the batch file and UnRAR.exe in the same folder. Or else the program won't work.
  • Don't rename the UnRAR.exe.
  • The password cracker can only crack numeric passwords.
  • The password cracker does not crack passwords starting with 0.
Do not forget to leave your feedback!
Article by Anbuselvan rocky..

video :

         Vidoe will be soon... still connected.. Happy hacking.

Baca Selengkapnya ....

Want to Change Facebook theme ?

Posted by Unknown Minggu, 23 Juni 2013 0 komentar

Change facebook login screen background


The traditional Facebook login screen is very boring and monotonous since it took a long time with no changes. Maybe Facebook have forget about changing that Background Screen or even a little changes. Now you can change the Facebook Screen Background to any Picture that you want to put, using a very simple method. This trick is about a Chrome Extension that will help you do that with few clicks. So we Post it For you al fanz.
How to Change Facebook Login Screen Background Picture
1) First of all, Go to FB Refresh Chrome Extension.
2) Click Add to Chrome, then confirm by clicking Add button.


3) After adding the plugin to Google Chrome, Go to  chrome://chrome/extensions/   to access all Chrome extension settings.
4) Now scroll down until you find the installed extension (FB Refresh), then Click Options just below it.
5) When you click Options, you'll be redirected to settings page of FB Refresh.
6) Under Image URL/Upload section you can paste the Image URL that you can find on Google Image Search or simply Upload an image of you.
 
7) You can also customize some other settings (Repeat X/Y, Size...) if needed.
8) After that, you have to Click on Save button in the bottom of the page.
Done! Now you can visit Facebook and notice the new Background that looks very stylish.
EnjoY (-_-)

Baca Selengkapnya ....

How to customize System files ?

Posted by Unknown 0 komentar

How to Customize System Properties (Sysdm.cpl) in Windows XP?


Caution : The following article is written By Vishal Gupta. I love this article so i want to post it in my blog.. sorry gupta i am just sharing your post not plagarism ;)

In this tutorial, we'll tell you how to change the first tab "General" in System Properties dialog box of Windows XP. Following is a screenshot of the dialog box which you'll get after following this tutorial:

1. Here are some images, which will be required to add in dialog box. Download the ZIP file, extract it and you'll get the BMP files:
Download BITMAPs
2. Open C:\Windows\System32\sysdm.cpl file in Resource hacker.
3. Now we'll need to replace existing 1.BMP file with the downloaded one. To do this:
  • Go to Bitmap -> 1 -> 1033.
  • Click on Action -> Replace Bitmap....
  • Click on Open file with new bitmap... button.
  • Select the new downloaded 1.BMP file and click on Open button.
  • Finally click on Replace button.
4. Now we'll need to add remaining downloaded BMPs in the file. To do this:
  • Click on Action -> Add a new Resource ....
  • Click on Open file with a new resource... button.
  • Select 4.BMP and click on Open button.
  • Give 4 in Resource Name and 1033 in Resource Language text boxes.
  • Finally click on Add Resource button.
5. Repeat 4th Step for other BMPs (5.BMP & 6.BMP) also. (Resource Name for 5.BMP & 6.BMP will be 5 & 6 respectively and Resource Language will be 1033 for both).
6. Now go to Dialog -> 101 -> 1033 and replace existing code with the following code:
101 DIALOGEX 32, 10, 376, 215
STYLE DS_FIXEDSYS | DS_MODALFRAME | WS_POPUP | WS_VISIBLE | WS_CAPTION
CAPTION "General"
LANGUAGE LANG_ENGLISH, SUBLANG_ENGLISH_US
FONT 8, "MS SHELL DLG"
{
CONTROL 6, 0, STATIC, SS_BITMAP | SS_CENTERIMAGE | WS_CHILD | WS_VISIBLE | WS_GROUP, 1, 4, 106, 207
CONTROL "Windows Edition", 304, BUTTON, BS_GROUPBOX | WS_CHILD | WS_VISIBLE, 110, 5, 265, 73
CONTROL "", 52, STATIC, SS_LEFT | WS_CHILD | WS_VISIBLE | WS_GROUP, 130, 20, 162, 8
CONTROL "", 54, STATIC, SS_LEFT | WS_CHILD | WS_VISIBLE | WS_GROUP, 130, 36, 100, 8
CONTROL "", 58, EDIT, ES_LEFT | ES_AUTOHSCROLL | ES_READONLY | WS_CHILD | WS_VISIBLE, 147, 192, 107, 8
CONTROL "System", 304, BUTTON, BS_GROUPBOX | WS_CHILD | WS_VISIBLE, 110, 80, 265, 65
CONTROL "", 62, STATIC, SS_BITMAP | SS_CENTERIMAGE | WS_CHILD | WS_VISIBLE, 272, 152, 89, 54
CONTROL 4, 0, STATIC, SS_BITMAP | WS_CHILD | WS_VISIBLE | WS_GROUP, 326, 90, 41, 47
CONTROL 5, 0, STATIC, SS_BITMAP | WS_CHILD | WS_VISIBLE | WS_GROUP, 235, 98, 80, 15
CONTROL "", 63, "Link Window", 0x50000000, 130, 101, 100, 8
CONTROL "", 64, "Link Window", 0x50000000, 130, 91, 100, 8
CONTROL "", 65, "Link Window", 0x50000000, 130, 111, 100, 8
CONTROL "", 66, "Link Window", 0x50000000, 130, 121, 100, 8
CONTROL "", 67, "Link Window", 0x50000000, 130, 131, 100, 8
CONTROL "&More Information", 69, BUTTON, BS_PUSHBUTTON | WS_CHILD | WS_DISABLED | WS_TABSTOP, 235, 123, 80, 14
CONTROL "Windows Activation", 304, BUTTON, BS_GROUPBOX | WS_CHILD | WS_VISIBLE, 110, 147, 265, 60
CONTROL "PID :", 0, STATIC, SS_LEFT | WS_CHILD | WS_VISIBLE | WS_GROUP, 131, 192, 17, 9
CONTROL 1, 0, STATIC, SS_BITMAP | WS_CHILD | WS_VISIBLE | WS_GROUP, 309, 13, 64, 59
CONTROL "This version of Windows is Genuine.", 0, STATIC, SS_LEFT | WS_CHILD | WS_VISIBLE | WS_GROUP, 131, 180, 115, 10
CONTROL "Copyright (c) 2006 Microsoft Corporation. All rights reserved.", 0, STATIC, SS_LEFT | WS_CHILD | WS_VISIBLE | WS_GROUP, 115, 54, 195, 9
CONTROL "", 56, EDIT, ES_LEFT | ES_AUTOHSCROLL | ES_READONLY | WS_CHILD | WS_VISIBLE, 130, 160, 100, 8
CONTROL "", 57, EDIT, ES_LEFT | ES_AUTOHSCROLL | ES_READONLY | WS_CHILD | WS_VISIBLE, 130, 170, 100, 8
}
7. Click on Compile Script button.
8. Now to change the text "Microsoft Windows XP" & "Version 2002" (or similar):
  • Go to: String Table -> 12 -> 1033.
  • Change the String in 180 to "Windows VISTA™ Ultimate Edition" & click on Compile Script button.
  • Similarly go to: String Table -> 13 -> 1033.
  • Change the String in 195 to "Customized by : VISHAL GUPTA" and click on Compile Script button.
9. At last Save the file and close Resource Hacker.
10. You can also see an image in the screenshot having "ask for Genuine Microsoft software" text. If you want to show it as well, then copy "OEMLogo.BMP" and "OEMInfo.INI" files present in downloaded ZIP file to "C:\Windows\System32\" folder.
11. That's it. We have done. Now you'll get the same look as shown in the screenshot.
NOTE 1: If you are facing problems while saving the file after editing in resource hacker, then make sure you have disabled WFP (Windows File Protection) service using WFP Patcher or use Replacer to replace the file.
NOTE 2: If you get "Cannot create file" error message while saving the file, please check following tutorial:
How to Fix "Cannot Create File" Error Message While Saving Files in Resource Hacker?

 the Original credits goes to  vishal gupta.


Baca Selengkapnya ....
Trik SEO Terbaru support Online Shop Baju Wanita - Original design by Bamz | Copyright of android news.